Feeds:
Posts
Comments

Archive for December, 2009

This started as a comments response to my post A muslin story, but then it just got long enough for its own post, so here it is.  Thank you to Robin and Sue and Elizabeth for their thoughts!

I cut the pattern, Burda 3-2009-112 in a 46, the largest size in the pattern, partly because it is the size my measurements indicated and partly because my tracing paper is too thick to see the lighter-weight tracing lines of the smaller sizes very well!  But I think that truly I’m a Burda 44, at the largest, having made a skirt not too long ago from Burda in the 44 which fit well enough with some wiggle room at the waist line.  For my next Burda project, I’ll get lighter-weight tracing paper!  I was really surprised that this is so roomy in the bust in particular — I am a DD so hardly any pattern that is at all fitted is a good fit without a full-bust adjustment. (I’m a 46 based on my high-bust measurement, BTW, not my full bust measurement.)

I got most of my pattern pieces laid out last night — my fabric is narrower than what Burda recommends, but JUST long enough to eke it all out.  Also, I figured out what pieces need interfacing and wrote up a little to-do-list to make sure I get everything cut out that needs cutting out; this part is the dullest for me, I think.

I am going to leave my coat unlined, per the pattern, and I haven’t figured out how to finish the seams.  I have a serger but it needs to go to the spa to get fixed up.  I think I just did a zigzag stitch on the skirt that I made with the same fabric a few years ago, and that has held up.  This coat will not get laundered, it’ll always get dry-cleaned and/or steamed and brushed.  I don’t want to spend the time to add seam-binding, and as this is not heavyweight wool I also worry that seam-binding would show through as lumps on the outside.

I also need to trace out and cut out the pattern pieces for the pockets.  I’m going to wait on tracing out and cutting out the belt pieces, since I don’t have the hardware for it yet.  Also, if I hate the coat, I don’t want to spend the extra time and material on a belt for it; sewing a belt isn’t  hard enough to want to try it out for practice, and I don’t want to buy any new equipment if I don’t have to.  I will do the pockets in any event, I think, because I am trying to learn pockets.

I have an interfacing question — for the collar pieces, I have silk organza, which I think will work nicely and which I’ve worked with before, for waistband interfacing.  But I don’t have a large enough piece of organza for the large facing piece that goes down the inside front of the coat and turns over for the bottom of the collar.  I do have a lightweight woven interfacing that feels like rayon that I think I’d like to use, but I’d love some informed feedback if you have it to offer, so here goes:

This interfacing is intended to be ironed on, but then in washing or steaming the very lightweight amount of glue comes off or something, and so ultimately it is not fused to the fabric.  I’m guessing this means it’s normally intended for lighter-weight fabrics that shift a lot, which is not what I’m working with — my wool is a medium-weight fabric and very easy to work with, it’s not shifty at all.

Also, in storing this rayon interfacing, it’s gotten pretty wrinkled.

So, first question — should I put aside this interfacing and go with something else that’s not a fusible? (the wool fabric is a crepe, I think, with a slightly nubby texture, and as a result I don’t want to use a fusible interfacing).  I have some other interfacings in house that I could use instead; I am such an interfacing n00b that I don’t have any real sense of what’s best.

Second question — if I do decide to use this interfacing, what should I do to try to de-wrinkle it, keeping in mind that I can’t iron it because of the glue on one side?  Right now I’ve got it draped over a bookcase in the hopes that the wrinkles will fall out a bit.

Third question — is the wrinkling a bad sign that this is not a good interfacing for this project?  Wool crepe is not excessively wrinkly, but wouldn’t one of the main points of interfacing be to keep the fabric from getting wrinkly/mashed down?

Okay! Thanks for thoughts and advice!

Read Full Post »

A muslin story

Elizabeth, your finished coat looks great!  It’s an inspiration. As soon as I get off the computer with this very belated update, I’m going to go tackle my fashion fabric.

I have three muslin photos to share and a question to ask.

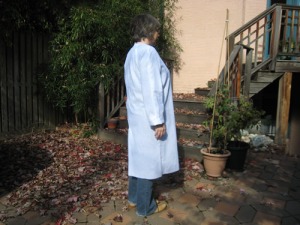
I’ve got a medium-weight sweater on under my muslin in this picture.

I’m sewing the same coat that Elizabeth did — Burda 3-2009-112.  My perception of the muslin is that I’m happy with the way the arms fit at the shoulders, and the way it fits in the back.  In the front, it seems really large with a lot of overlap at front center — but I’ve never made a coat before, and I’m inclined to go ahead and just put this together and sew it up!

Elizabeth and others, looking at my muslin, what do you think?  It just seems baggy to me in the front, which surprised me because I’m so busty that normally my problem is that things are too small across the front.  The roominess in this seems wrong somehow.  Do you think it’ll be okay, though?

I am taking your interfacing thoughts to heart, Elizabeth; in fact, I recently spent about an hour and a half at Ragtime Fabrics in Harrisonburg, Virginia, selecting about eight different interfacings to experiment with over the next several projects.  I usually use silk organza interfacing, which works well; if I have enough on hand I’ll use that at the sleeves.

Originally I wasn’t planning to do the pockets as they appear in the pattern, but seeing Elizabeth’s finished coat I’ve had a change of heart, and now I plan to sew those pockets, I think they look cooler than they did in the Burda photo.

I’m doing mine in a wool crepe (I think — it was a remnant that I bought several years ago).  I have a skirt I made in the same fabric that I’ve really enjoyed wearing and that was easy to sew up, so I’m confident the fabric is going to work well enough for these purposes.  It’ll be a lightweight, springy coat, which at the rate I’m going will be just right for timing!

Read Full Post »

The trench in all its glory…

Or, how I got my trench on.    Be forewarned that this will be a picture heavy post. 

Friday night I did the last bits of hand sewing, attaching the buttons, “fixing” the overly long lining problem, etc.  On Saturday, before the snow came down in NYC metro area, I wore it out with Jack in the ‘hood.  When I stopped by my sister’s apartment, my brother-in-law was floored that I had made the coat myself.  I’m gonna take that as a compliment. 

Here’s my PatternReview review with a few additional comments:

Pattern Description: 3-2009-112 — From Burda: Material is the special feature!  The metallic fibres sparkle on the casually crinkled lightweight poplin and its dark bottle-green colour matches nearly everything.  This coat is uncomplicated to sew: it’s not lined and also does without the traditional sleeve tabs.

Pattern Sizing: 38-46, I made the size 40 because I wear suits all the time for my job and wanted the extra ease for bulky clothes.

Did it look like the photo/drawing on the pattern envelope once you were done sewing with it? Yes and no.  I used a different fabric and it had a crisper hand and stiffer drape than the fabric used on the model in the magazine, but the silhouette was the same.

Were the instructions easy to follow? The instructions were typical Burda, a little inscrutable, but if you have sewn a coat before, they should make some sense. 

What did you particularly like or dislike about the pattern? I originally liked the pattern for the raglan sleeves, thinking they would be easier for me as a beginner, but with the top stitching that one does on a trench coat for style reasons, it ended up being a little more difficult.  The key point to ensure you follow in the Burda instructions is to stitch the shoulder seams’ top sleeve seams as continuous seams.  If you don’t, your top stitching won’t match from front to back.  Also, don’t forget to clip into your curved seams, otherwise you run the risk of very puckered seams.  Ask me how I know.

I loved the simplicity of the pattern.  It’s a classic trench look without all the “bling” like tabs, gun flaps, or epaulettes.  I wasn’t looking for an overly intense experience for this project.

Fabric Used:  Navy cotton with peach skin finish on one side for the outer shell.  Silk charmeuse for the lining.  Notions cannibalized from my Burberry trench coat (RIP 11/30/09): buttons and belt buckle.

Pattern alterations or any design changes you made: Because I’m a glutton for punishment, I added a lining.  The pattern is for an unlined coat, but I didn’t want to add french seams and I wanted a finished look on the inside.  It was relatively simple to add the lining, I just used the front and back  and sleeve patterns minus the space for the facings.  I stitched the lining together and attached it to the facings after I almost completely constructed the coat and attached the collar. 

I only used interfacing in the belt.  Burda suggests interfacing the collars and facings as well as the vent.  My collar is a little floppy even with the stiffer cotton fabric that I used, so I definitely recommend interfacing the collar. 

Would you sew it again? Would you recommend it to others? I most likely will not sew this again as I don’t need another trench coat, but it was a great introduction to coat making.  I definitely recommend this coat to anyone needing a classic yet simple trench coat.

Conclusion:   This was a huge learning curve for me.  I am a beginner sewist and have not attempted anything so complex before.  There were a lot of firsts for me in this project: buttons, button holes, notched collars, eyelets for the belt, slip stitching, adding a lining, adding patch pockets, and top stitching.  I’m sure I am forgetting something here, but that’s already quite a list. 

One more thought in parting:  This is meant to be a more casual, unlined coat, and a “quick” project because of those characteristics.  However, due to the simplicity of the pattern, this coat feels a bit unstructured even with adding a lining.  Possibly this is due in part to the lack of my interfacing, but I really feel the lack of structure in the collar and shoulders.  It’s difficult to put into words, but it feels not as substantial as I think a coat should feel.  But that may be because I am expecting more from it than I should.  If I want more substance from a trench coat, then I suppose I should put the time and effort into making a more traditional one with all the bells and whistles. 

And now for more pictures. 

side view

back view

flashing the lining

close up

notched collar

Did you see the Burberry buttons???  What about the belt buckle and Prym Vario eyelets?

To make the Burberry buttons more secure, I added small buttons on the interior side of the coat.

interior buttons for stability

As mentioned in my previous post, the lining suddenly grew about an inch and a half the other night.  Tacking it up didn’t help; it still drooped below the hem in some spots.  I did a temporary fix of making the lining hem a little higher on one side, but at my next lesson I will try to resolve the problem a bit more elegantly and more permanently.  See below…

temporary fix of the lining hem

Here’s what remains of my Burberry trench, just the outer shell which is stained beyond recovery, devoid of all it’s notions, and the lining which I will salvage for a future unknown project.

the sad remains of my Burberry trench

salvaged Burberry lining

I am looking forward to wearing my trench to work tomorrow, assuming it’s warm enough of course.  I am also looking forward to working on something other than a trench coat.  😉

Best wishes to all participating in the Trench Sew Along who are still on their trench journey.  I can’t wait to see your versions.

Read Full Post »

(Warning: No trench pictures in this post) 

Ugh.  I thought I was going to wear my trench today.  I had just the finishing stuff left to do… You know, buttons, belt buckle, hand sewing, etc.  But everything takes so long.  You think it’s going to be quick and then it’s painfully slow-going.  I’m not complaining, although it may sound like it.  Really I’m not.  I just can’t wait to wear this coat. 

As mentioned earlier in the sew along, I intended to cannibalize my existing Burberry trench coat which I detested for numerous reasons.   I can’t tell you how satisfying it was to take it apart and be able to use the things I love about the coat: the leather buckle, the cool Burberry buttons.  I am also going to salvage the Burberry lining (which isn’t slippery at all and totally useless as a lining) and use it for something else.  I don’t know what but something.  Maybe I could make a scarf for my trench?  I wonder if I have enough fabric left from my trench to use on one side.  Hmmm… 

Prym Vario-Snap Kit (image from Atlanta Thread)

I have to tell you how much I love my new Prym Vario-Snap Kit.  I put the eyelets on my belt and love them.  I want to put eyelets on everything now.  What a cool thing this is.  LOVE IT!  It’s so easy to use.  I just want to point out one thing for anyone who has not used one of these things before that’s not explained on the very spare and terse instruction sheet.  Once you’ve pierced the fabric, place the eyelet so that it protrudes through the hole in the fabric so that when you use the “pliers” to press the eyelet into place, the metal “bites” all the fabric all the way around.  If you don’t, you run the risk of not all the fabric catching and the eyelet attached only half way.  Ask me how I know this.  *nodding sagely* 

There is one itty bitty problem with the trench however.  THE LINING SUDDENLY GREW OVERNIGHT AND HANGS BELOW THE HEM NOW.  Thea and I checked and double checked the length of the hem.  I think we even triple checked.  How could it suddenly grow an inch and  half?????  Please let me know how I can remedy this situation.  PLEASE!!! 

I would really like to use my trench coat tomorrow.  I will attempt to avert the lining disaster and finish the last bits of hand sewing and attach the buttons tonight.  Wish me luck and send me lining suggestions please.

Read Full Post »