Feeds:
Posts
Comments

Archive for the ‘Uncategorized’ Category

Finished!

‘Tis not pressed, has only a pin holding the neckline in place but …. ’tis done!
Finishing off bits and pieces.Catch-stitched the outer fabric.Unpicked a little of the side seam and inserted the ties.The lining sewn down.

Finished! It does need a good steam.Details I liked.Centre back seam and 2-3 tiny darts either side of the CB.The side ties, an alternative to belting the entire coat.I even think I could wear the neck open.
Things not yet done – button for the neck, hook and eye on the inside to hold the under coat piece.

Read Full Post »

Whew!

That's a whole lotta coat!

It’s done! Well, mostly done. The buttonholes still need a bit more work before they go into heavy-duty use, but they’re in at least.

It’s not perfect by any means, but it’ll be wearable and (hopefully) warm. You can find all the nitty-gritty details on my blog here, and the flickr slideshow here. The pattern, once again, is Butterick 5425.

This is my first winter coat, and it was a very, very long road. I want to thank everyone here for their tips and suggestions, as well as their own posts that I learned so much from!

Read Full Post »

Binding, My Way

I needed 2-3m of binding for my wrap coat and I ended up using the silver grey Bemberg silk that was the lining fabric, thank you Tanis Itis for her suggestion. As I had very little fabric left I had to piece bits together to get the length I needed. I’ve put together a small tutorial showing one, of many ways, to make binding. I thought perhaps it may help someone, especially if they have only scraps of fabric left to making binding.
To stabilize the silk I interfaced it with black Sheer Pro Elegance interfacing. This is very fine and doesn’t affect the drape much and it also put a hint of darker shade into the silk.

Next I found the 45 degree angle from the edge of the fabric (which is the bias) and started cutting strips – cut these to the width necessary. I used 8cm (2 3/8th in) for mine and used a cutting board with rotary cutter. This makes nice clean and accurate edges.

To piece the cut pieces together, I used a 45 degree angle seam as this makes an almost unnoticeable seam when the binding is used, less noticeable than a straight seam.

Lay the two pieces right sides together, one piece at 90 degrees to the other. With a chalk marker and ruler, rule across diagonally from one side to the other. Pin to stop pieces moving. You now have your sewing line. Sew the seam.

And the completed seam. Trim away some of the seam allowance, I left approx 6mm (1/4 in).


Trim off notches and then sew a line of straight stitching along the seam line, the width of your preferred seam Press stitching line, then press open.allowance. I choose 1.5cm (5/8 in).
And you can see the completed binding.

Now, you have a choice on whether you pin the binding to the right side or the wrong side of your garment. I choose to pin right sides together as I hand-sewed the binding to the wrong side. If you choose to pin the right side of the binding to the wrong side of your garment you can turn the bias to the right side and topstitch by machine.
You can see how the binding will look once it is hand-stitched down.

Read Full Post »

Sewing the Lining

I’ve been sewing the lining of my Wrap Coat and it’s coming along well.

You can see the ‘as yet’ unpressed darts and pinned centre back seam. Provided I used a 70/10 needle with the Bemberg silk my machine sews perfectly.
Instead of serging/overlocking the seam allowances on the silk I used a couture method from Roberta Carr’s book ‘Couture-The Fine Art of Sewing’ where you top-stitch close to the seam from the right side and then trim back the seam allowance. Instructions start on page 163 of my book. She calls it a welt seam and it can be used to stiffen a seam to make it more stable or you can use it when you are sewing a sheer or white fabric and want to trim away excess seam allowance.

You don’t need to clip any curves (or maybe very minimal on a thicker fabric), the seams lie very flat and there is no bulk.

It does take extra time to top-stitch but it’s worth it. It’s a nice look.

Because the coat back is not cut on the fold I fiddled around and worked out how I could add some extra ease into the back lining. All I did was cut the backs 2cm wider then sewed my usual 1.5cm seam but at the top and bottom I sewed in an extra 1.5cm for about 6-8cm and this I pressed open, then top-stitched around which created a pleat and left the extra ease in the back.

Probably not the proper way to do it but the pattern instructions are not clear on adding a lining so I muddled around. Then I realized later on, duh, that as it was the lining and I needed extra ease I could have cut the centre back on the fold and it wouldn’t have mattered!
I also cut every pattern piece 2.5cm shorter than the outer fabric so my lining should end up hanging shorter and not showing at the hem.
If anyone has any ideas for trim (I need to bind the collar, centre front openings and the sleeve hems) then I would love to hear. I have had a bit of a search on the internet (Etsy, Ebay and some online stores) to see if I could find something that would work but haven’t had any luck. I’m happy to make binding myself but can’t use any self-fabric as I don’t have scraps big enough to use. Also, I’m thinking that a contrast might look good and that’s also what the pattern picture shows.

Parting Shot: Still warm from the iron so Valentina decides my coat lining is the perfect place to sit.

Read Full Post »

It Has Arrived!

Finally my Bemberg lining arrived.  Isn’t the packaging beautiful? The fabric is a perfect match for the wool. This coat has bound edges and I know I’m going to struggle to find something that is going to suit without being too harsh.  Black is too harsh against the soft silvery coloured wool and I have absolutely no fabric left to make a self-binding.  The pattern picture has a contrast binding but I’m not sure that’s what I want.Inside the package was a lovely note and some buttons, as a thank you for placing an order. I really do like this shop for online ordering. The fabrics are really good quality and their attention to detail for their customers is the best I’ve come across so far.

And if you sew for children, included in my package was this business card advertising an online children’s fashion magazine dedicated to sewing for your child. There are patterns for the beginner sewer through to the advanced sewer. It is part of Waetcher’s Fabrics but does have it’s own website. It is free to sign up for the online magazine and then you can choose the garment you wish to make and order the kit.  It also looks like you can buy the magazine.

Enjoy!!

Read Full Post »

The great coat blitz…

Looking not-terribly-glamorous on the hanger. I hung it from my upstairs-railing to make hemming it easier.

Was not successful. I had really hoped to have it done this past weekend, so I could start wearing it. However, I was stymied at every turn. I realized I have no buttons for it. Then I got sick, which puts running out to find buttons a little out of reach. It did, however, give me time to do some finishing touches. At this point, all I need is to get buttons on and decide how to do the button holes. My automatic-buttonhole stitch won’t work, as it doesn’t handle thick fabric well (and by thick I mean anything heavier than blouse-weight). It is obviously way too late for bound buttonholes. This leaves me with plain machine zig-zags or hand-buttonholes. I should do some samples to help me decide, especially since I doubt I’ll be able to acquire proper buttonhole twist for doing hand-buttonholes in a reasonable time frame (i. e. right away… I want this done).

But here’s a few shots of what I have accomplished.

Chain-tacks in the hem:

chain tacks between lining and coat hem

My very own label:

” 

Printed on T-shirt iron-on, then fused to twill tape.

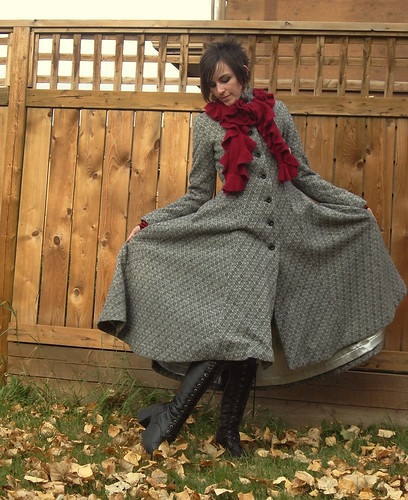
That’s a whole lotta coat!

The whole skirt spread out (before hemming)

I’m still having a lot of trouble with how the front skirt of the coat hangs; there seems to be distortion along the centre-front seams (despite them being cut on the straight grain). It probably has to do with my interfacing the facings rather than the coat front (this is why you should read your instructions thoroughly FIRST), as well as the coat hanging un-finished for quite a while. I’ve re-sewn it twice (including understitching) and at this point short of pad-stitching the whole front (which may yet happen) I’m not sure there’s anything that can be done. Anyone who’s a more fabulous tailor than I have any suggestions for the next time, though? I’m a sucker for this kind of long, full-skirted coat so I can see this coming up again.

So anyway… so close, yet so far away.

Read Full Post »

This is where I am up to and I can go no further. I’m awaiting the arrival of the lining fabric, hopefully coming this week.
Mum came to visit, we went shoe shopping and then we fitted the coat on me and there were quite a few adjustments to make.
The side front piece had a considerable amount of flare and didn’t look good (on me) so we pinned out quite a bit from the front but left the side back as it was, only taking out extra along the entire CB seam.
I found I didn’t need to have made such a big FBA. This pattern block is designed using a C-cup and it really was roomier than I anticipated. So I had to remove some fabric from the front princess seam.
Next up was pinning and sewing in the sleeves. I had not previously used this method of attaching raglan sleeves but I found it extremely simple and easy way to do it. You finish the sleeve seam and the side seams of the coat were already sewn. Then pin the sleeve to the coat, right sides together and sew.
The unpinned raglan shoulder dart. I love these darts, it creates a sort-of shoulder line in the raglan sleeve. The pinned dart, ready for sewing.

The finished and pressed dart.
I needed to take some excess out of the back, so added in a third dart and you can see my chalk line inside the basted original stitching line.
Three darts pressed and looking good. The fabric is fantastic to sew, ease and press. It’s a wool/cashmere blend by Ralph Lauren which I bought from Fabric Mart and similar to this, although my fabric doesn’t have the yellow undertone and also has a silver thread running through it.

Read Full Post »

I can has sleeves!

My daughter took the picture... sorry for making you tilt your head!

After much wrestling, pinning, re-pinning, basting, and finally the application of a felt-tipped marker, I got my sleeves in. They are not perfect, but I think they look decent; no one who’s not a tailor will notice. I also made my own thin shoulder pads and sleeve-heads, which don’t add much bulk but do smooth the shoulder line nicely. There’s still a bit of bulk from the princess seam crossing the shoulder… I’m not sure if it bugs me or not.

Anyway, later today I will tackle setting the sleeves in the lining and starting on my interlining! Then, there’s just putting it all together…

A (somewhat) nicer looking shot...

Read Full Post »

This is the pattern.

I altered pattern pieces and made a muslin.

There are teeny, tiny darts in the back but Trudy Jansen (pattern designer) says small darts make fitting better. To have things fit nicely it is worth while putting the time in to use more smaller darts than one big one. Okay, they are finicky but …

… they will look good.
There is also a centre back seam, another place to tweak for a better fit.
My coat has been cut out. I’ve used some fabric I had already, it’s a wool/cashmere blend with a tiny silver thread running through.

I have fused all the interfacing onto all the pattern pieces. That was a long job. I used Pro Sheer Elegance from Pam of Fashion Sewing Supply and followed her instructions for how to apply it. Instructions are available from her website.

And my finished interfaced pieces are hanging up ready for sewing.

Read Full Post »

Inching along (part II)

I can wear it! ... almost

I actually got the shell sewn together to the point where I can try it on. I really don’t feel like this pic does it justice—the skirt is so awesomely fun, full and long and swishy. My “petiteing” through the armscye seems to have fixed the bust-level problem and the saggy-armpit problem. It won’t be especially roomy, but I guess I didn’t really want it to be.

Next step—inserting the sleeves. That’s where it will all go to heck, I expect. Anyone got any tips for basting them in nicely? 😀

Read Full Post »

Older Posts »