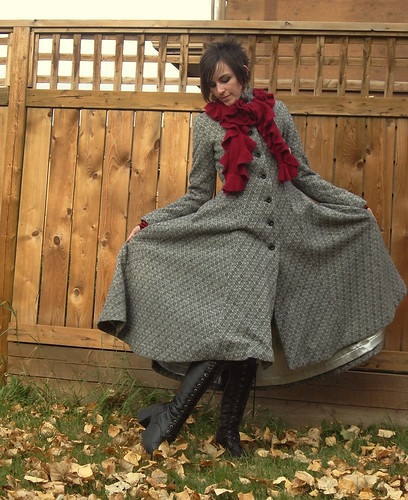
I finally finished my trench coat – (Let’s not mention the time schedule here or the fact I should have been making a winter coat instead!)
Without further ado, here it is:

More photos on my blog and i’ll be posting the pattern review soon as well!


I finally finished my trench coat – (Let’s not mention the time schedule here or the fact I should have been making a winter coat instead!)
Without further ado, here it is:
More photos on my blog and i’ll be posting the pattern review soon as well!
Posted in McCalls | Tagged Mccalls M5525, Trench Coat Sew Along | 5 Comments »
I have spent all weekend furiously trying to finish off my trench coat. I must warn you that there has been quite a lot of swearing involved! I have had a lot of topstitching drama – I just cannot get the tension right on my sewing machine. It is forever looping underneath and then the needle gets stuck. To top it all off I then I ran out of top stitching thread and it’s a Sunday!! But It’s all done really except for attaching the lining to the main coat and then top stitching that down + buttonholes. Not that much left to do, I am gutted I couldn’t finish it though. It’s been hanging over me for months and I feel like I can’t start anything else without finishing this off.

Posted in McCalls | Tagged Mccalls M5525 | 3 Comments »
‘Tis not pressed, has only a pin holding the neckline in place but …. ’tis done!
Finishing off bits and pieces. Catch-stitched the outer fabric.
 Unpicked a little of the side seam and inserted the ties.
 The lining sewn down.
Finished! It does need a good steam. Details I liked.
 Centre back seam and 2-3 tiny darts either side of the CB.
 The side ties, an alternative to belting the entire coat.
 I even think I could wear the neck open.
Things not yet done – button for the neck, hook and eye on the inside to hold the under coat piece.
Posted in Uncategorized | 3 Comments »

Simplicity 2311
Here’s my pattern review for Simplicity 2311, my beloved purple coat pattern. I’m officially in love.
Pattern Description: Misses’ Coat in two lengths with collar, sleeve and belt variations. I made Coat B in the shorter length with the tie belt and wide collar. I did not include any buttons as my fabric was grabby and the belt was sufficient to keep the coat closed.
Pattern Sizing: 14-22. I made the sz 14 and found it very true to size with little fitting adjustments needed.
Did it look like the photo/drawing on the pattern envelope once you were done sewing with it? Yes! Yes! Yes! (aside from the different color fabric)
Were the instructions easy to follow? The instructions were easy to follow if you read carefully. I found myself skipping on ahead thinking I understood everything perfectly. It really pays to read and follow along one or two sentences at a time before moving on to the next step.
What did you particularly like or dislike about the pattern? I LOVED the pattern; it is drafted so well. The collar did not need any pad stitching to retain its shape. My teacher said that most RTW collars don’t have any pad stitching, especially when using a fusible interfacing, and I took the excuse and ran with it; the collar came out great.

The princess seams and CB seam allowed for great fitting opportunities. I love the multiple opportunities for top stitching, which takes this coat from plain jane to a gorgeous model in heartbeat. My Emerald 183 has a special topstitching stitch that made my topstitching look so professional. I recommend loading up on matching thread if you plan to topstitch most of the seams. I used 3 and a half spools of Gutterman thread for this project. Top stitching accuracy is easy, if you take it slow.

FYI: I did not find there to be excess ease in the sleeve head. Yes, you had to gather, but with a wool fabric, I would expect that. In fact, I found the amount of ease needed to be gathered quite minimal. I did not have any problems with puckering nor did I end up with a poofy sleeve. Love that!

The only dislikes I have, which are minor, are that the hem with the lining attached needs to be tacked to the shell. That instruction was not included in the pattern sheets. I think its necessary or else the hem will sag and show the lining. I will tack my hem down tonight.

Also, I think some kind of hand stitching in the ditch is needed to join the upper collar/lining/under collar together at the shoulder/neck area so that they act as one piece instead of two pieces that can pull away from each other as you take the coat on and off. But these are minor points and would probably be obvious to advanced sewists.
Any difficulties encountered? The most difficult part of this pattern is when you attach the shoulder and collar to the back yoke. The shoulder and collar form a U when sewn together and sewing that U shape to the squarish yoke is a bit tricky. You have to pivot at just the right spot making sure not to catch the shoulder in the seam you’re creating. And then after the pivot, you have to move the collar out of the way to continue. Just make sure you sew this part slowly and carefully and you will be fine. I even needed to do one pivot over again, and it was actually easier to do the second time, because the stitching from the first pass allowed me to hold the pieces together better for more accurate sewing.
Fabric Used: I used an imperial purple wool purchased from FabricMart in Sept 2009 and a silk charmeuse in a coordinating purple color from Metro Textiles purchased in August 2010.

Both fabrics were a dream to sew. The wool pressed beautiful.
Pattern alterations or any design changes you made: The only fitting change I made to the pattern was to sculpt the CB seam to take some of the squarishness out of the fit and give it a more fitted and tapered look from the shoulder blade to waist area (in total I took about .75 inches out tapering to the yoke and waist). I thought I might need to fiddle with the princess seams in front, but left them as is so I could wear suit jackets underneath if need be.

I did add some interior structure changes to the pattern such as a interfacing all the pattern pieces, and adding a back stay and sleeve heads. The pattern already called for shoulder pads which I included, but I decided to make my own since I didn’t like the store bought ones that I had bought for this project which were made out of foam. I just looked at my RTW winter coat to see how its shoulder pads were constructed and did the same.


Would you sew it again? Would you recommend it to others? I honestly can say that I would sew this again. I tend to do only one complicated project a year, so I won’t probably make this again anytime soon, but I love this pattern. When I make it again, I might place the carriers lower on the coat as I am long waisted. As they are indicated on the pattern, they fall about an inch or two below an empire waist. I would like them about an inch lower. So be sure to check placement for yourself before blindly following the pattern’s placement.

I definitely would recommend this pattern. Maybe not to a beginner as it is a long and involved project (although a beginner could definitely make this pattern; I just think it’s a complicated process to make a coat with many opportunities for frustration), but an intermediate or advanced beginner would definitely enjoy making this pattern. I think an advanced sewist would enjoy the excellent drafting and fit of this coat and could add more structure and couture details to make it their own.
Conclusion: Great pattern!!!! I love my coat and am so proud of the work I put into it and all the interior structure details I included. I received so many compliments today on my coat.

I wish all of you well who are still in progress on your coats. I can’t wait to see everyone’s finished coats!!! Good luck.
Posted in Pattern Review, Simplicity | 6 Comments »
I have been getting some unexpected but welcome sewing time this week. Not much, but enough to make some incremental yet gratifying progress on my fall coat. I was able to cut out the interfacing and fuse it to my sleeves on Monday as well as cut out my back stay. Last night I was able retrofit my back stay into the shell of my coat.
I say retrofit the back stay because, if you will kindly recall, I have already constructed the shell of my coat without installing the back stay along the way. Someone forgot to sew it in. I’m not going to name any names, but Elizabeth that person just completely forgot about the back stay because I she was so excited about sewing my the luscious purple wool. I knew I wanted to incorporate a little structure into my coat as I wanted it to be a little more substantial than my trench coat last year. However, that doesn’t mean I am going to pad stitch the lapels. I’m not going crazy here, I mean sheesh! 😉
I bet you’re wondering how you retrofit a back stay. And I bet you’re wondering how many times I can say retrofit a back stay in this post. Hahaha! I thought about it for a while and then I thought, why not ask on Pattern Review. Nancy K answered me right away. She suggested that I sew the back stay onto the seam allowances of my shell. A simple yet elegant solution to a knotty problem.
So I got to work. I cut out the back stay by combining the pattern pieces of the back yoke and the back, overlapping 5/8ths at the seam. I cut the stay from two inches below the armscye and used my french curve to angle up to the CB fold ever so gently. Et voilá a back stay was born! I used the cotton flannel for the stay that I was originally going to use for interlining the coat. I decided against that because I am lazy wanted a more transitional fall coat rather than a winter coat. Then I staystitched the neck and armscye of the stay and pinned it to the back of my shell. I carefully stitched the stay to the seam allowances of my shell, only once sewing it to the actual back for a few inches. Of course I spent some quality time with my seam ripper at that point. Fun times I tell you, taking out stitches from wool. Fun times indeed.

That’s the stage where I remain today my friends. I will reconvene with the sewing committee (aka my Emerald 183) tonight and see where the evening takes me. I can’t wait!!!! Of course as the weather is wont to do, it will be dipping into fall temps on the morrow, so I am feeling a lot of pressure motivation to finish this coat pronto!
*crossing fingers for some good progress tonight!*
Posted in Simplicity | Leave a Comment »
Good morning everyone!
Yesterday, I was gifted with rare, uninterrupted daytime sewing time by a friend who took Jack off my hands for a few hours. Wow! You can get soooo much done during the day when you are fresh and don’t have to deal with sub-par lighting. I almost completely constructed the shell (minus the facing). Saturday night, I fused my little interfacing heart out with Kashi’s interfacing. I had enough for everything but the sleeves, so I will use Pam Erny’s for the sleeves, because I received my order last Thursday. In retrospect, I guess I could have waited for my order to arrive, but then I wouldn’t have all that nice doubleknit now would I? 😉
I thought I’d share with you a little trick I picked up on the interwebs… I think it was from R0bin’s blog, A Little Sewing on the Side. She interlined her winter coat with hymo and to reduce bulk at the darts, she cut the excess fabric from the dart of her fashion fabric after sewing the dart, and she just cut the hymo on the dart legs before sewing it to the fashion fabric. Et voilá! So while I forgot to cut the excess fabric from the dart of my fashion fabric, I did remember to cut the dart legs on my interfacing. So when I was ready to fuse, I just brought the sides of the dart on the interfacing together as if it was sewn and fused it to the fabric that way. It worked like a charm. See the picture below for how I cut out my interfacing. Using the pattern pieces, I just lifted up the edges of the pieces to cut inside the cutting line so that each interfacing piece would be slightly smaller than the fabric piece. That way, I would reduce bulk and reduce the chances of fusing my ironing board!

And here’s all my pieces (minus the sleeves) interfaced and ready to be sewn. Now isn’t that a pretty picture???

So, as I mentioned before, I had a lot of time to sew yesterday. I completed the outer shell construction during the day and last night I made the tie belt. I did a lot of top stitching. A. LOT. I love it. On Carolyn’s recommendation, I used the special topstitching stitch on my Emerald 183 (remember, I am not using my “new” Singer Featherweight 221 yet until I get the kinks figured out). I love this stitch! Basically, it’s a straight stitch that’s slightly longer and is sewn twice, side by side, so that it’s slightly wider and longer looking, making for a beautiful topstitch. I practiced different ways to topstitch on scraps before I actually did it on my coat. BTW, I highly recommend that; I always practice my stitches for every new piece of fabric I sew. That way there’s no nasty surprises during construction. I tried two threads through the needle with an even longer stitch, but the stitches weren’t consistent. My only wish for the special topstitching stitch would be the option to make it longer than 3.0 which is the max length setting on my machine. I think the topstitching would look even better at 3.5. But I still love the way my topstitching looks now, so I’m a happy camper.
So tonight, I will fuse my sleeves, re-cut my lining back pieces (remember the dreaded grease ring?) and continue constructing my coat. By my calculations (time you think it will take you to finish x 3 = actual time to finish), I might be able to finish this coat by Weds night. That is, if I put in three solid evenings of at least 4 hours of sewing time each night. Remember, I’m a slow sewist.
Wish me luck!
Posted in Simplicity | Leave a Comment »
That's a whole lotta coat!
It’s done! Well, mostly done. The buttonholes still need a bit more work before they go into heavy-duty use, but they’re in at least.
It’s not perfect by any means, but it’ll be wearable and (hopefully) warm. You can find all the nitty-gritty details on my blog here, and the flickr slideshow here. The pattern, once again, is Butterick 5425.
This is my first winter coat, and it was a very, very long road. I want to thank everyone here for their tips and suggestions, as well as their own posts that I learned so much from!
Posted in Uncategorized | 3 Comments »
I needed 2-3m of binding for my wrap coat and I ended up using the silver grey Bemberg silk that was the lining fabric, thank you Tanis Itis for her suggestion. As I had very little fabric left I had to piece bits together to get the length I needed. I’ve put together a small tutorial showing one, of many ways, to make binding. I thought perhaps it may help someone, especially if they have only scraps of fabric left to making binding.
To stabilize the silk I interfaced it with black Sheer Pro Elegance interfacing. This is very fine and doesn’t affect the drape much and it also put a hint of darker shade into the silk.

Next I found the 45 degree angle from the edge of the fabric (which is the bias) and started cutting strips – cut these to the width necessary. I used 8cm (2 3/8th in) for mine and used a cutting board with rotary cutter. This makes nice clean and accurate edges.

To piece the cut pieces together, I used a 45 degree angle seam as this makes an almost unnoticeable seam when the binding is used, less noticeable than a straight seam.

Lay the two pieces right sides together, one piece at 90 degrees to the other. With a chalk marker and ruler, rule across diagonally from one side to the other. Pin to stop pieces moving. You now have your sewing line. Sew the seam.

And the completed seam. Trim away some of the seam allowance, I left approx 6mm (1/4 in).


Trim off notches and then sew a line of straight stitching along the seam line, the width of your preferred seam Press stitching line, then press open.allowance. I choose 1.5cm (5/8 in).


And you can see the completed binding.

Now, you have a choice on whether you pin the binding to the right side or the wrong side of your garment. I choose to pin right sides together as I hand-sewed the binding to the wrong side. If you choose to pin the right side of the binding to the wrong side of your garment you can turn the bias to the right side and topstitch by machine.
You can see how the binding will look once it is hand-stitched down.
Posted in Uncategorized | 2 Comments »
I’ve been sewing the lining of my Wrap Coat and it’s coming along well.

You can see the ‘as yet’ unpressed darts and pinned centre back seam. Provided I used a 70/10 needle with the Bemberg silk my machine sews perfectly.
Instead of serging/overlocking the seam allowances on the silk I used a couture method from Roberta Carr’s book ‘Couture-The Fine Art of Sewing’ where you top-stitch close to the seam from the right side and then trim back the seam allowance. Instructions start on page 163 of my book. She calls it a welt seam and it can be used to stiffen a seam to make it more stable or you can use it when you are sewing a sheer or white fabric and want to trim away excess seam allowance.

You don’t need to clip any curves (or maybe very minimal on a thicker fabric), the seams lie very flat and there is no bulk.

It does take extra time to top-stitch but it’s worth it. It’s a nice look.

Because the coat back is not cut on the fold I fiddled around and worked out how I could add some extra ease into the back lining. All I did was cut the backs 2cm wider then sewed my usual 1.5cm seam but at the top and bottom I sewed in an extra 1.5cm for about 6-8cm and this I pressed open, then top-stitched around which created a pleat and left the extra ease in the back.

Probably not the proper way to do it but the pattern instructions are not clear on adding a lining so I muddled around. Then I realized later on, duh, that as it was the lining and I needed extra ease I could have cut the centre back on the fold and it wouldn’t have mattered!
I also cut every pattern piece 2.5cm shorter than the outer fabric so my lining should end up hanging shorter and not showing at the hem.
If anyone has any ideas for trim (I need to bind the collar, centre front openings and the sleeve hems) then I would love to hear. I have had a bit of a search on the internet (Etsy, Ebay and some online stores) to see if I could find something that would work but haven’t had any luck. I’m happy to make binding myself but can’t use any self-fabric as I don’t have scraps big enough to use. Also, I’m thinking that a contrast might look good and that’s also what the pattern picture shows.

Parting Shot: Still warm from the iron so Valentina decides my coat lining is the perfect place to sit.
Posted in Uncategorized | 2 Comments »
 Finally my Bemberg lining arrived. Isn’t the packaging beautiful? The fabric is a perfect match for the wool. This coat has bound edges and I know I’m going to struggle to find something that is going to suit without being too harsh. Black is too harsh against the soft silvery coloured wool and I have absolutely no fabric left to make a self-binding. The pattern picture has a contrast binding but I’m not sure that’s what I want.
 Inside the package was a lovely note and some buttons, as a thank you for placing an order. I really do like this shop for online ordering. The fabrics are really good quality and their attention to detail for their customers is the best I’ve come across so far.


And if you sew for children, included in my package was this business card advertising an online children’s fashion magazine dedicated to sewing for your child. There are patterns for the beginner sewer through to the advanced sewer. It is part of Waetcher’s Fabrics but does have it’s own website. It is free to sign up for the online magazine and then you can choose the garment you wish to make and order the kit. It also looks like you can buy the magazine.
Enjoy!!
Posted in Uncategorized | 1 Comment »

